PS2 to Parallel Converter
PS/2 Keyboard to Parallel Adapter
Older machines and single-board computers, particularly ones from the mid-to-late ’70s through the very early ’80s often used a parallel keyboard input. It was very common during this time for a hobbyist to ‘roll their own’ system with parts from different sources. Keyboards with a 7 or 8 bit parallel ASCII output were available from several sources, but are no longer manufactured. Occasionally you will see one on eBay, but usually for an exorbitant price.
There are PS/2 to serial or parallel adapters available on eBay, but they often don’t have a strobe signal, and no way to adjust the timing to use with older equipment. I have had no luck at all with these. If, like me, you are into older machines and system boards from that era, you were stuck either spending a lot of money or trying to adapt a no-name adapter board and try to make it work.
This situation was my inspiration for the adapter shown here. It’s cheap, uses readily available parts, and allows you to use a common PS/2 keyboard with your old systems. Here is a short list of the features:
- Strobe Output - This is the main shortcoming of the adapters you see on eBay. They have no strobe output available when data is valid/available. This adapter has a very flexible strobe output, with a changeable strobe pulse length.
- Configurable Polarity - The logic sense (active high or active low) for the strobe and data lines are independently configurable. In other words, you can have an active-low strobe and active high signal lines if your system needs it.
- Backspace Setting - Backspace can be changed to send a backspace (0x08) or delete (0x7f).
- Propagation Delay - The adapter allows you to adjust for cable length, so that the data is sure to be valid when the strobe pulse arrives. I have found this to be really useful even with short cable lengths. It gives the input circuitry time to settle before the keyboard data is clocked into the system by the strobe.
- Test Mode - Not sure if is the adapter or a miswired cable? Test mode makes it easy to cycle the strobe and data lines individually to check your work.
- Configuration Menus - All of the settings can be easily changed using a set of menus via the serial port. Once set, a serial port connection is not required for normal operation.
- Settings In Flash - All of the changeable parameters are preserved across power cycles in flash memory. There is also a ‘factory’ reset to values I’ve found useful.
- Single 5V Supply - The adapter only requires a single-ended 5V supply. This supply also powers the PS/2 keyboard through the adapter. Multiple Keyboard Layouts - The adapter now supports both QWERTY and AZERTY keyboard layouts (thanks Philippe!) Hex images for both are provided below.
Parts List
- (1) Arduino NANO (eBay search here)
- (1) PS/2 Jack, Female (eBay search here)
- (1) DB15 or DB25 Connector (eBay search here)
The circuit
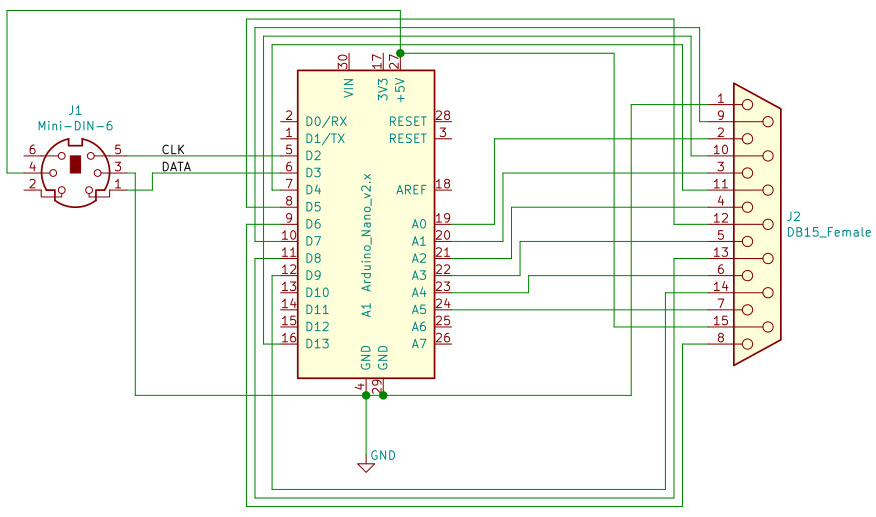
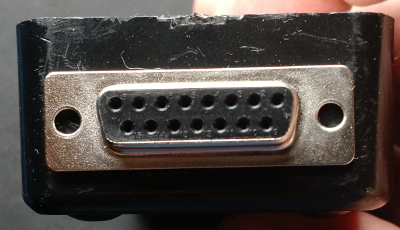
There is not a lot to this circuit. All of the functionality is done through software on the Arduino Nano. For my version, I chose a DB-15 female connector. That provides enough pins for +5V, GND, Strobe, 8 data pins and 4 extra function pins that I have yet to define. Here is the pin mapping that I used:
| DB-15 | Function | Nano | AVR |
|---|---|---|---|
| 1 | GND | GND | GND |
| 2 | BIT0 | A0 | PC0 |
| 3 | BIT1 | A1 | PC1 |
| 4 | BIT2 | A2 | PC2 |
| 5 | BIT3 | A3 | PC3 |
| 6 | BIT4 | A4 | PC4 |
| 7 | BIT5 | A5 | PC5 |
| 8 | BIT6 | D6 | PD6 |
| 9 | BIT7 | D7 | PD7 |
| 10 | STROBE | D13 | PB5 |
| 11 | XTRA1 | D4 | PD4 |
| 12 | XTRA2 | D5 | PD5 |
| 13 | XTRA3 | D8 | PB0 |
| 14 | XTRA4 | D9 | PB1 |
| 15 | +5V | 5V | VCC |
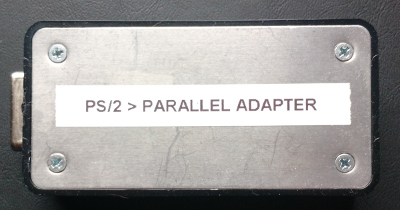
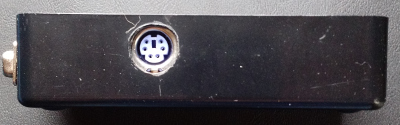
Here are some pictures of the prototype. Please excuse the rough appearance - I recycled parts of several old projects, including the case and PC board (click for larger images):
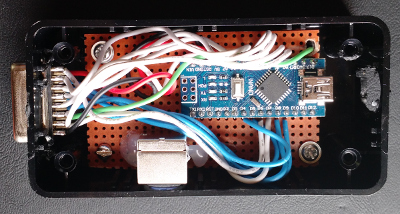
I like using the ATMega328P in the Nano’s form factor for small projects like this. I’m not a big fan of the Arduino “environment”, however. The code below compiles using avr-gcc, and is easily burned to a Nano using avrdude. If you would like to build this project but don’t want to set up the build environment, I’m happy to flash the code onto a Nano for you - just contact me to make arrangements.
Here is the .hex file you can burn to a Nano: nano-ps2.hex (AZERTY version here)
Here is the source code if you would like to make modifications: nano-ps2-source-v0.2.tar.gz
This is a terminal session to help you decide if this project meets your needs, and to demonstrate what the menus look like. The comments in bold show non-printable keystrokes in the serial console (need a simple terminal program? Try binterm:
PS/2 --> Parallel ASCII Adapter v0.01
Initializing PS/2 keyboard...
Loading configuration...

(1) Strobe Type  ............. : POS
(2) Strobe Length ............ : 5ms
(3) Output Logic ............. : POS
(4) Propagation Delay ........ : 100us
(5) Backspace sends .......... : BACKSPACE (0x08)

Characters typed on this console will be sent to host via parallel
interface.

CTRL-D = toggle display mode    CTRL-R = PS/2 reset
CTRL-T = test mode              CTRL-Y = change configuration
CTRL-Y pressed in serial terminal…
Configuration Menu

(1) Strobe Type  ............. : POS
(2) Strobe Length ............ : 5ms
(3) Output Logic ............. : POS
(4) Propagation Delay ........ : 100us
(5) Backspace sends .......... : BACKSPACE (0x08)

[1-5], [S]ave, [D]efaults, [E]xit: 2
Strobe Length in ms (1-255): 10

Configuration Menu

(1) Strobe Type  ............. : POS
(2) Strobe Length ............ : 10ms
(3) Output Logic ............. : POS
(4) Propagation Delay ........ : 100us
(5) Backspace sends .......... : BACKSPACE (0x08)

[1-5], [S]ave, [D]efaults, [E]xit: Saving...

Configuration Menu

(1) Strobe Type  ............. : POS
(2) Strobe Length ............ : 10ms
(3) Output Logic ............. : POS
(4) Propagation Delay ........ : 100us
(5) Backspace sends .......... : BACKSPACE (0x08)

[1-5], [S]ave, [D]efaults, [E]xit: Exit

(1) Strobe Type  ............. : POS
(2) Strobe Length ............ : 10ms
(3) Output Logic ............. : POS
(4) Propagation Delay ........ : 100us
(5) Backspace sends .......... : BACKSPACE (0x08)

Characters typed on this console will be sent to host via parallel
interface.

CTRL-D = toggle display mode    CTRL-R = PS/2 reset
CTRL-T = test mode              CTRL-Y = change configuration
CTRL-T pressed in serial terminal…
Test
[S]et Strobe, [C]lear Strobe, [W]rite Value, [E]xit: Set Strobe
[S]et Strobe, [C]lear Strobe, [W]rite Value, [E]xit: Clear Strobe
[S]et Strobe, [C]lear Strobe, [W]rite Value, [E]xit: Write Value
Enter Value (does not invert!) [0-255]: 128
[S]et Strobe, [C]lear Strobe, [W]rite Value, [E]xit: e
Returning to normal operation...

Characters typed on this console will be sent to host via parallel
interface.

CTRL-D = toggle display mode    CTRL-R = PS/2 reset
CTRL-T = test mode              CTRL-Y = change coonfiguration
CTRL-D pressed in serial terminal…
<display on>t[0x74]e[0x65]s[0x73]t[0x74][0x88][0x87]
CTRL-D pressed in serial terminal…
<display off>Characters typed in the serial terminal will be send just like keys pressed on the PS/2 keyboard...
Updates
05/04/20
Nicolas, F4HXT was kind enough to allow me to share his experiences using this adapter:
Dear Mike

I'm trying to restore an old RTTY decoder from MicroWaves Modules (the MM4001) and I have to make a new ASCII keyboard, the old one is lost.

So I'm interrested by your project to convert a PS/2 Keyboard to ASCII, in order to have a compatibe parallel keyboard to my MM4001

I have done the hardware part (PS/2 to Nano, Nano to Parallel link) but I can't upload the provided hex file to my Adruino Nano.  Using avrdude or XLoader, It doesn't work.

Don't you mind to send me your file.ino, it would be easier to upload it into my Nano using Arduino IDE ?

My best 73,
-----------------------
F4HXT --- Nicolas


Hi Mike

Thanks a lot for the reply

Usually I have my Arduino IDE environment under Windows 7.
But I have also another laptop with Linux (Mint 17)

I tried again to upload the Hex file and I succeded to burn the Nano.
Now your software is executing into the Nano and it works very well.
It's just a jewel of programmation.

But now I have a new question : Could I change the keyboard layout to AZERTY  ?

Thanks a lot Mike and I wish you a good day

73 QRO from France,
-----------------------
F4HXT --- Nicolas
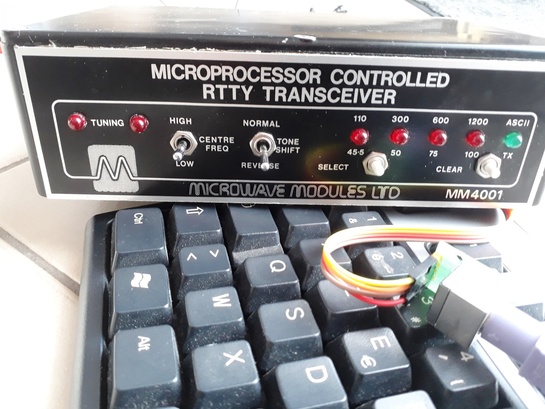
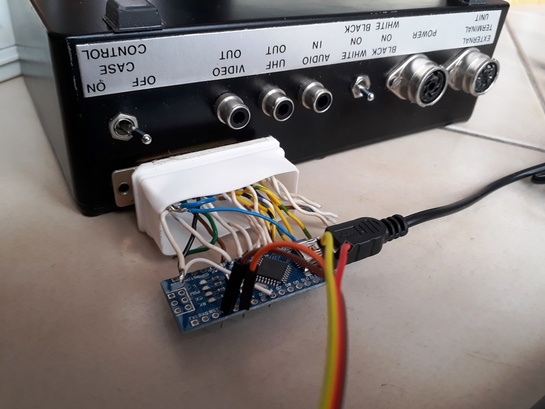
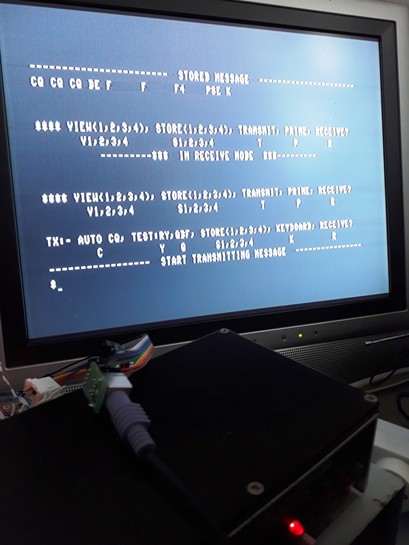
Nicolas also shared some great pictures of the MM4001 in action with the adapter:
02/13/22
Philippe Roehr was kind enough to provide patches to support AZERTY keyboards. For anyone else interested in an alternate keyboard layout like AZERTY, here is where to start:
- Install the avr toolchain (avr-gcc, avrdude, etc)
- Download the source code here and unzip it into a directory.
- Look in the file ps2.c, specifically in the function kbd_read(). That is where the scan-code from the keyboard is mapped to characters. You would need to make changes to the giant switch statement, re-mapping scan codes as needed, and re-compile using the provided makefile. If you are unsure what the scan codes are, simply load the HEX file from this site, then hit CTRL-D to toggle display mode. As you type, you will see the scan codes.
- “make burn” should load the resulting hex file onto your nano (NOTE: you may have to edit the default device in the makefile, depending on your setup)