Weather Station
Design
For years, I had been running a home-brew weather station based on PIC microcontrollers, analog temperature and humidity sensors and a BME180 pressure sensor housed in a Stevenson Screen. It worked reliably for about 6 years, until a lightning storm near-hit cooked the electronics.
I decided that it would a great time for an upgrade. In addition to temperature, humidity and pressure, I also wanted to measure rainfall, wind speed, and wind direction. I chose the Bosch BME280 (local mirror) as my sensor for temperature, humdity and pressure. Overall, I’ve been reasonably pleased with the accuracy, although I have discovered it can be senitive to placement and air-flow/particulate related issues (see enclosure below).
For rain and wind, I selected a 80422 Assembly available from Argent Data Systems I like these sensors because they are relatively simple in construction, and very easy to interface to a microcontroller. All three sensors use reed switches, magnets, and resistors for sensing.
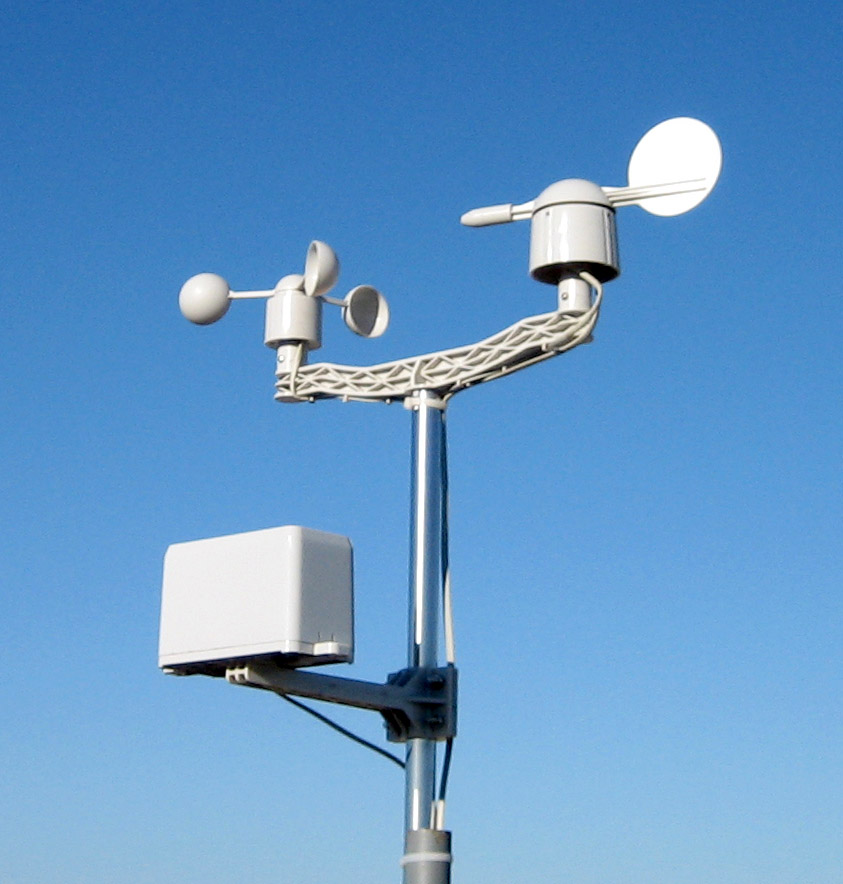
It is interesting to note that the Argent Data wind and rain sensors are identical in size and construction to the Ambient Weather WS-2080. The manual (local mirror) for the WS-2080 has some helpful information on siting the sensors, and properly aligning the wind sensors (pages 5-11).
Enclosure
The old system used a Stevenson Screen for the temperature and humidity sensors. After reading this paper by Tarara and Hoheisel, I decided to construct a Gill-style ventilated enclosure. I had noticed that the Stevenson-style enclosure would have a noticable temperature error on very still days, even with a double insulated roof. The active ventialtion of the Gill-style enclosure seems to have mostly overcome that effect, with the added bonus that the sensor responds more quickly to changes in the environment. The fan in the enclosure is a simple 12V square computer fan, run at a slightly lower voltage to reduce air flow. The BME280 sensor break out board is mounted so that the air entering the enclosure blows gentlty against the back of the BME280 sensor board; air then has to wrap around the edges of the board and create small vorticies before coming in contact with the sensor. The goal is to try and prevent small particulates (pollen, dust, etc) from being drawn driectly against the small BME280 sensor window.
Circuit
The circuit for the weather system is shown below. For most of my projects, I roll my own AVR-based boards - but I was interested in a quick implementation for this project. In this case, I used a cheap Arduino Nano clone off of eBay (~$3) as the core of the system.
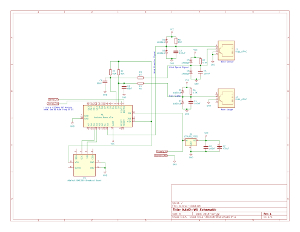
Click here for larger schematic.
Both the rain gauge and anemometer provide contact closures via a reed switch. The rain gauge closes once for every 0.011" of rainfall. The anemometer closes once per second for every 1.492 MPH of wind (please refer to the 80422 data sheet for details). Both of these signals are configured to be active low - the reed switch grounds an input on the Nano. Both the wind speed and rain signals are routed through a basic input protection circuit (D5/D6/R7/C5 and D3/D4/R6/C4) to prevent transients from pulling D2/D3 on the Nano outside of -0.5V or +5.5V. Current limiting resistors R3 and R4 prevent damage to the Nano input pins. R5 forms a voltage divider with the wind direction sensor resistors, and the input is fed to A0 on the Nano. I2C comunication with the BME280 break out board is via A4 and A5. A link between the weather station and data logging system is provided via two 433MHz serial-to-RF modems, set to an appropriate Ham frequency permitted in the US.
Software
The Arduino Nano INT0 (D2) and INT1 (D3) inputs are set to trigger interrupts. The interrupt routines count the number of pulses from the anemometer and rain gauge. The A/D value of A0 (the wind direction input), as well as temperature, humidity and pressure, anemometer and rain gauge are all sent as raw values when the weather station is queried. The Arduino sketch is here You will also need the Cacti.io BME280 library, available here WARNING: It was a quick hack over a weekend, so this code is far from clean but it will get you going.
On the inside of the house, I have connected one of the 433MHz modems to a Raspberry-Pi 3, via a USB-to-serial converter. A driver polls the weather station for data every 5 seconds, and also performs housekeeping (like resetting the wind count every 15 seconds and resetting the rain gauge count every night at midnight). The driver emits raw weather data to a flat file (/var/run/nwx.dat), as well as Peet Brothers format via TCP/3000. Weewx is configured using the WS1 driver in TCP mode, which connects to the driver, receives the Peet Brothers data packets, and logs and presents the weather data you see here.